Banish raw edges and join two or more pieces of plastic canvas together with Overcast Stitch.
If you haven't tried this stitch yet it's really easy to do and essential to learn for 3D plastic canvas projects. I'm on hand to guide you through it and Fred's even got a top tip for you. With our help you'll be overcasting like a pro in no time.
Work from either right to left or left to right, whichever is most comfortable. Click on the pictures to make them bigger.
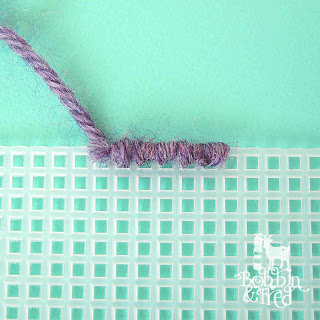
Raw edges: Secure the end of the yarn by holding the last inch to the back of the canvas and passing the needle through each hole from the back to the front two or three times covering the tail of the yarn. At corners you may need to pass the needle through a couple more times to cover the canvas.
Raw edges: Secure the end of the yarn by holding the last inch to the back of the canvas and passing the needle through each hole from the back to the front two or three times covering the tail of the yarn. At corners you may need to pass the needle through a couple more times to cover the canvas.
This is how it'll look from the front (left) and from the back (right).
Secure the end by passing it underneath the overcast stitches at the back or by passing it underneath the backs of stitched areas.
Join together: anchor the end of the yarn in one of the pieces next to where you want to join.
Hold the two pieces together and line up the matching holes then pass the needle through both holes two or three times. Continue along the join.
Hold the two pieces together and line up the matching holes then pass the needle through both holes two or three times. Continue along the join.
To finish, weave the end of the yarn underneath the backs of stitches in a few directions to secure it.
On curved seams where the holes don’t line up you may need to add some extra stitches. Take care to pass the needle through all the holes which have been stitched.
On curved seams where the holes don’t line up you may need to add some extra stitches. Take care to pass the needle through all the holes which have been stitched.
 Fred's Top Tip
Pliers Required! Sometimes the needle doesn’t pass underneath the other stitches or through the canvas easily so Fred the Goat recommends gripping it with pliers to pull it through.
Now you've learnt how to overcast stitch check out my free plastic canvas patterns and give it a go!
Fairisle Plastic Canvas Phone Pouch
Protect your phone with this cute Fair Isle Tent Stitch Pouch. It's sturdy, hard-wearing and even splash proof!
Set phasers to stun your friends with this retro insignia badge! Make one for a friend or keep it for yourself...I won't tell if you don't 😉
If you’d like to show yours off email me your photos to bobbinandfred @ hotmail dot com or tag me @bobbinandfred or #bobbinandfred on Instagram. I’d love to see them!
I hope this has been helpful, if you have any questions do hit me up in the comments below.


No comments