Hello Plastic Canvas Enthusiast!
Are you puzzled about how to join two pieces of plastic canvas together on a right angle to build a box shape? Or perhaps you want to join two pieces of plastic canvas to make a larger piece of canvas? Not sure what to do with those naked edges? Then this blog post will get you on track to plastic canvas construction heaven.
In this installment of Hand Stitch SOS I'm going to show you the various ways to join two pieces of plastic canvas so you can construct your own 3D designs and how to finish off those naked edges for a gorgeous finish.
So what is overcast stitch and how do you do it?
If you haven't tried this stitch yet it's really easy and essential to learn for 3D sewing with plastic canvas and for finishing 2D pieces really nicely. I'm on hand to guide you through it and Fred's even got a top tip for you. With our help you'll be overcasting like a pro in no time.
To kick us off I'm going to show you how to use overcast stitch to join two pieces together on a right angle.
Knowing how to do this means you can make 3D pieces like a phone pouch, a badge, a keyring or even a project bag.
The possibilities really are endless. If you can dream it, you can make it, so let's get cracking and make all of your plastic canvas project dreams come true!
How to Cover Raw Edges of Plastic Canvas
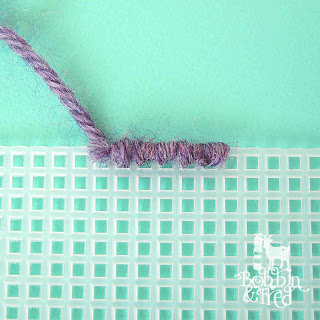
Work from either right to left or left to right, whichever is most comfortable.
1. Secure the end of the yarn by holding the last inch to the back of the canvas and pass the needle through each hole from the back to the front two or three times per hole to cover the tail. At corners you may need to pass the needle through a couple more times to fully cover the canvas.
|
|
How to Join Two Pieces of Plastic Canvas Together to Create a Right Angle
This is how you'd join the sides of a box together for instance, it's also how to construct a 3D phone pouch.
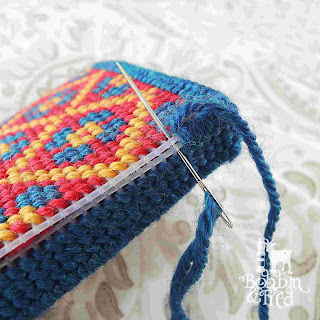
1. Anchor the end of the yarn in one of the pieces next to where you want to join.
2. Hold the two pieces together and line up the matching holes then pass the needle through both holes two or three times. Continue along the join.
3. To finish, weave the end of the yarn underneath the backs of stitches in a few directions to secure it.
4. On curved seams where the holes don’t line up you may need to add some extra stitches. Take care to pass the needle through all the holes which have been stitched and those that are unstitched. You'll likely need to pass the needle and thread through each set of holes three times for the best coverage.
How To Join Two Pieces of Plastic Canvas to Create a Flat Layer
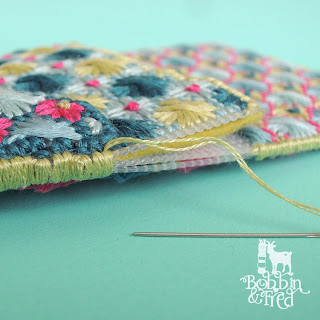
1. This one's really easy, just lay the two (or more pieces) you want to sew together on top of each other, taking care to line up the threads and holes of the canvas.
2. Anchor the thread in the back of the stitches and pass the needle through each set of holes. It's exactly the same process as overcasting a raw edge but sewing through two or more layers.
You can do this on a straight edge or on a diagonal. It's how I joined the diagonal edges of the Flower Power Keyrings.
How To Join Two Pieces of Canvas to Make A Bigger Piece
1.Overlap the two pieces you'd like to join so the threads and holes line up.
2. Sew through both layers of canvas simultaneously to join them. You will be able to detect the join so I tend to do this in places it won't be too noticeable.
How To Overcast Stitch a Diagonal Edge
1. Line up the two pieces of canvas. Pass the needle through each hole two times and three times on the corners.
2. Stitch both sets of holes, the ones the needle's passing through in the photo above on the right and the ones the needle's passing through in the photo below on the left.
Pliers Required! Sometimes the needle doesn’t pass underneath the other stitches or through the canvas easily so Fred the Goat recommends gripping the needle with pliers to pull it through.
I hope this tutorial has helped guide you through the process of joining plastic canvas together in a variety of ways to create different joins and the know-how to cover those ugly bare edges!
If you have any question, please ask them in the comments and will do my best to help you out.
Did you enjoyed this post? Sign up to my newsletter
to get more stitchy goodness delivered directly to your inbox. I can't
promise it'll be weekly but I can promised it'll be a healthy dose of
floss-filled fun.
If this has inspired you to make something or helped you finish a project you'd already started, I'd love to see it. Say hello via email or tag me on Instagram using @bobbinandfred and #bobbinandfred.
Until next time, happy sewing stitch-tastic folks,


No comments