Do your fingers get sore from sewing or are the pads of your sewing fingers dotted with tiny grazes from the needle?
If you answered yes to either or both of these questions then you’ll be happy to know I did too. And, I know how to fix it! Read on for how you can achieve pain-free sewing, a thimble review and a tutorial showing you how to make my Vivienne Needlepoint Earrings.
All the discomfort and sewing savagery came to an end for me when Mum suggested I try using a thimble. Initially I found them tricky to handle but after a little bit of practice I got pretty good at it and now soreness and grazes are a thing of the past!
Since then I’ve been on the lookout for the perfect thimble. The ones I had were fine but they could be better so when Clover kindly gifted me an open sided thimble to try, I was eager to give it a spin.

To test it out I've made a pair of Vivienne Earrings and I’m sharing how it’s done so you can make a pair too.
First, I’ll show you the thimbles I’ve tried so far and how I got on with them and then we'll move on to the full tutorial to make a pair of Vivienne earrings.
You’ve most probably seen the common cup shaped thimble, you may even know and love it from the Monopoly board. They've got a dimpled surface and are made in a range of tough materials, I've seen them in metal, wood, and rubber.
I use a thimble a little differently to other stitchers. Usually, a thimble is worn on the middle finger to push the needle through the fabric and wearing one can dramatically improve your sewing speed. Rory Duffy has a fab video showing us how to use a thimble like a boss.
However, I use my thimble when I overcast stitch pieces of plastic canvas together and for that I wear the thimble on my thumb and use my thumb to push the needle through. Where a lot of floss is passing through each hole it gets increasingly harder to pass the needle through and the extra strength the thimble gives makes light work of this and spares my digits.

The cup like thimble I have is covered and encases the end of my thumb. As it’s meant for a fingertip and not a thumb, its sides are quite short and it doesn’t sit low enough down on my thumb. This means when I use it for this stitch, the needle is hitting a spot that is too high up to feel at ease with.
Also, my thumbnail stops it from sitting directly on the top of my thumb and so it feels like it’s just about to fall off. It’s worth noting that it fits my second finger well and would be great for the style of sewing Rory shows it being used for. It’s just not a good fit for me.

Next up, we have the ring thimble! This one was a breakthrough for me. It's lack of top meant I could position it lower down on my thumb, right where I wanted it, and it’s adjustable so I was able to make it fit. This one works brilliantly and I've used it a lot.
There are some cons: the surface area is relatively small and so I had to take care when I was sewing which did nothing for my speed but missing the thimble and hitting bare skin at full force is definitely an ouch moment you want to avoid, believe me.
Also, as it isn’t tapered like the cup, it sits at an angle and digs in. After a while a red raw mark appears where the bottom edge of the thimble and my thumb meet, so it isn’t ideal if you have a lot of overcast stitching to do, like say on the Turkish Jewel Scissor Pouch and Needlebook.

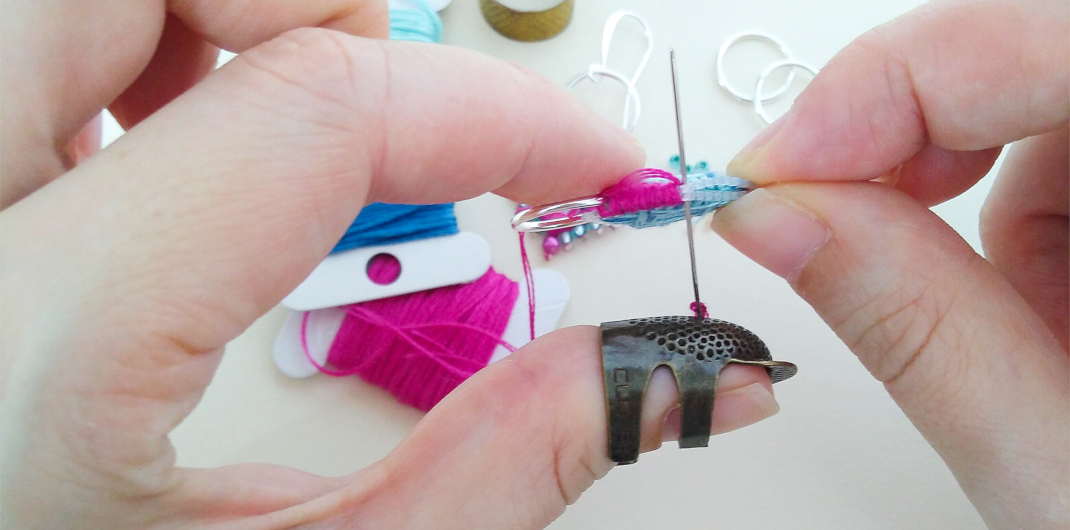
This is where Clover’s open sided thimble steps up to the mark. This baby is sculpted into a finger shape so it hugs your finger really nicely and because it is open sided long nails sit on top of the thimble. Both of these clever features meant I found it incredibly comfortable to wear.
This one is a size small and without adjustment it perfectly fit both my index and second finger but not my thumb. I had to use a small pair of jewellery pliers to open the thimble up and adjust the size. This was easy to do and once I had it fits quite nicely. It’s very snug but comfortable on my thumb.
I do wonder if sizing may be an issue. These thimbles only come in a small and a large. They are adjustable and the adjustment I made was comfortable but I’ve only adjusted to make mine larger; I don’t know what it’s like to make smaller.
The surface area is much larger than the other thimbles I’ve tried which is a big bonus! I can stitch wild and carefree, safe in the knowledge that my thumb is largely protected.
I use the thimble to push the needle through and also to grip the needle to pull it out of the other side and this is where the dimpled surface really comes into play and makes pulling the needle out an easy task.
So far, I’ve only used it on a small project and I’m still getting used to it. It feels bulkier than the ring thimble I was using but it doesn’t seem to dig in which is great. I know that ease will come with a bit more practice and with all of the other benefits in mind, I think I may’ve found my new favourite thimble. If I've tempted you to try one, chat with Clover for stockist info.
You’ve seen the thimbles, now it’s time to make the earrings!
TUTORIAL: DIY Vivienne Earrings
You will need:
4x 1” squares of 14ct plastic canvas
Embroidery floss for your choice (I used three shades)
Tapestry needle size 24
Bead needle
2x 14mm silver jump rings
A pair of silver earwires
20x size 9 seed beads
20x size 14 seed beads
2x 3mm glass pearls
Scissors
4x 1” squares of 14ct plastic canvas
Embroidery floss for your choice (I used three shades)
Tapestry needle size 24
Bead needle
2x 14mm silver jump rings
A pair of silver earwires
20x size 9 seed beads
20x size 14 seed beads
2x 3mm glass pearls
Scissors
About 1.5hrs (and a nice cup of tea, maybe)
Instructions
(Click on the pictures to make them larger)
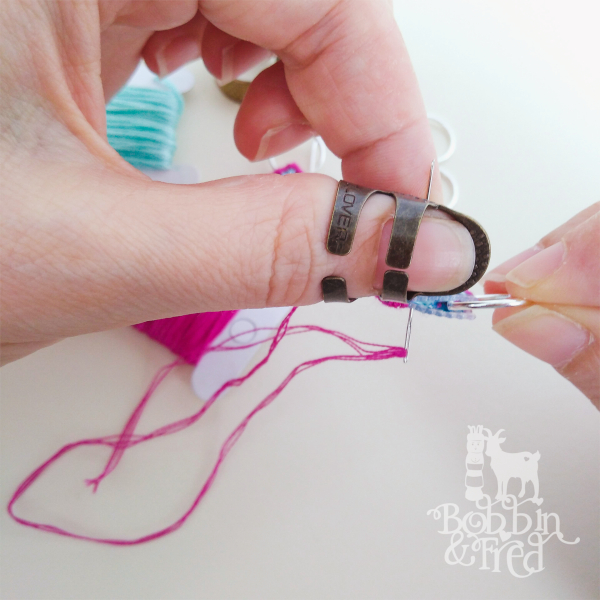
Step 1. Using 5 strands of floss (I used 3 light blue and 2 storm blue), sew Norwich stitches on all 4 squares of plastic canvas. Make each Norwich stitch 8x8. Sarah Homfray has an excellent video showing you the easy way to Norwich stitch if you need some guidance. Then, cut any excess plastic canvas off from around the edges of the stitch, making sure all of the edges are smooth.
Step 2. Using 3 strands of floss, sew a 14mm jump ring on the back of two of the Norwich squares.
 |
 |
Step 3. Place two squares, one with a jump ring attached and one without, back-to-back and bring the needle to the front of one of the squares.
Step 4. Overcast stitch around the outer edges, binding the two pieces together. Pass through each set of holes 3 times (you may need to add more stitches to the corners to ensure they’re covered in floss.
|
 |
Step 5. Once you’ve gone all of the way round, pass the needle through a few more already stitched sets of holes and then pass it underneath the stitching and trim the tail close to the stitched area.
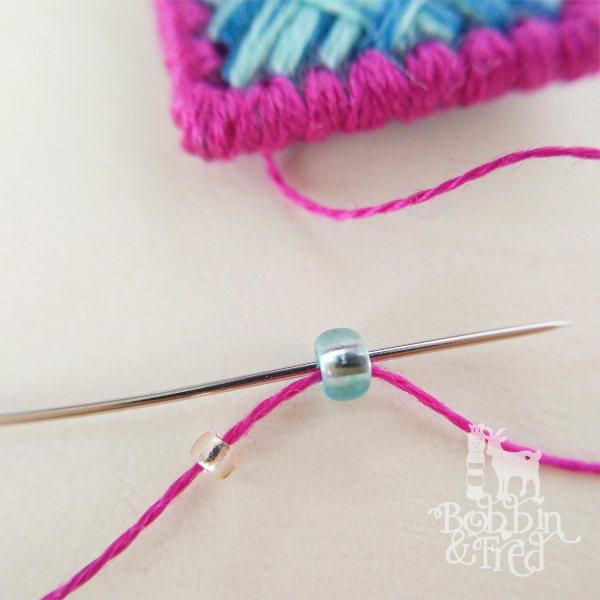
Step 6. Using 1 strand of floss and a bead needle, add the beads to the bottom edges. Anchor the thread by passing it underneath the overcast stitches and round and through a few sets of holes you’ve already stitched and bring the needle to the front of the first set of holes you’d like to add beads to. I start on the left and work to the right. Slide 1 size 9 bead and 1 size 14 bead onto the needle and down towards the stitchery.
 |
 |
Step 7. Pass the needle back through the size 9 bead and then into the back of the set of holes the needle came out from, pull taut to secure the beads into place.
Step 8. Repeat this step until all of the beads are attached, swapping the size 9 seed bead for a 3mm glass pearl when you get to the middle. Anchor the thread as before when all of the beads are stitched on and trim the tail.
 |
 |
Step 9. Using a pair of jewellery pliers, open the earwire loop and pop your stitched design on, close the loop with the pliers to finish.
Step 10. Repeat Steps 3-9 to create a pair.
 |
|
That’s all there is to it. I’m imagining you jumping with joy wearing your gorgeous handstitched earrings, feeling amazing! I’ve done that happy dance a few times, as well as this pair I've made them in green, pale blue, red, and pink. The possibilities are endless, make them in all of your favourite colours to match every outfit and wait for the compliments to pour in.
I'd love to see your Vivienne Earrings! Email your photos to bobbinandfred @ hotmail dot com or tag me on instagram @bobbinandfred or #bobbinandfred.
Would you like our sewing adventures, tutorials and much more delivered to your inbox? Sign up to our newsletter! I can't promise it'll be weekly but I can promise it'll be stuffed with hand stitched fun.
Have a fab, floss-filled week!
Shannan, Bobbin and Fred xX